
this is for my friend, susan... and anyone else who was wondering.
i'm sorry it took me so long to get this posted... but as promised, i'm writing to share my technique of how i get text in my photos to appear as if it is behind an object{s } in the photo. this post includes a couple of examples of this technique that i have used in the past. the photo in my last post is also an example of this.
there are probably numerous ways to achieve this visually, and my way may not be the best, but it works well for me.
i will just give a brief overview under the assumption that those who are reading have a working knowledge of the adobe photoshop software, which is what i use to add text to my photos. if you don't have photoshop, this may not make any sense to you. and even if you do have it, but don't have a working knowledge of layers and text and some of the tools i will be talking about, then feel free to e-mail me or comment on this post requesting a more detailed explanation of the process. i would be happy to explain.
so... here goes. after i add a type layer with the text that i want on my photo, i fine-tune it so it is the exact font, size, color and shape i want and in the exact position that i want it to be. when i am quite certain i have it where and how i want it, i duplicate the layer, turn off the original layer, click on the duplicate layer and rasterize it. rasterizing a text layer is just a fancy term for converting it from being editable text to being pixels that will not be editable... at least not with a cursor and keyboard. you can still change the look of the text, but at that point, the letters are pixels, just like the base layer {original photo }.
the reason i do this is because when the text is still editiable text {or what's called vector }, you can not erase portions of letters... you can only delete whole letters, and this would make it difficult to make the text appear as if it is going behind something in the photo.
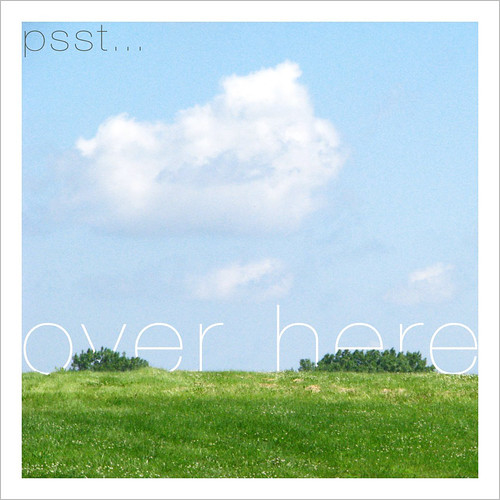
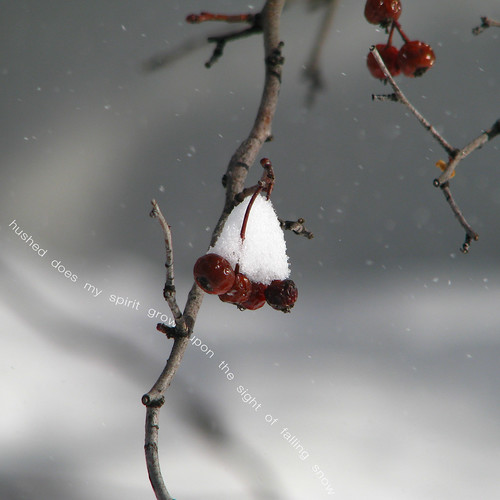
anyway, now that the text is converted to pixels, i can select my eraser tool and click/drag over the areas of text i want to erase... which would be the areas where i want the text to appear as though it is behind the object. for instance, in the photos above and below, i would erase the letters over these areas: the grassy hill and trees and the tree branch, respectively. in the magnolias photo that is in my post below, i erased over the area where the magnolias are so that the text appears to flow behind the tree. does this make sense?
i know there is a way to do this using photoshop paths, but i found this is the quickest and easiest way. i make my eraser brush size as small as i can, so that i can get in close to the edge of the object... i also zoom way in while doing this. this allows for more detailed manipulation and makes it more "realistic" and effective.
there are probably numerous ways to achieve this visually, and my way may not be the best, but it works well for me.
i will just give a brief overview under the assumption that those who are reading have a working knowledge of the adobe photoshop software, which is what i use to add text to my photos. if you don't have photoshop, this may not make any sense to you. and even if you do have it, but don't have a working knowledge of layers and text and some of the tools i will be talking about, then feel free to e-mail me or comment on this post requesting a more detailed explanation of the process. i would be happy to explain.
so... here goes. after i add a type layer with the text that i want on my photo, i fine-tune it so it is the exact font, size, color and shape i want and in the exact position that i want it to be. when i am quite certain i have it where and how i want it, i duplicate the layer, turn off the original layer, click on the duplicate layer and rasterize it. rasterizing a text layer is just a fancy term for converting it from being editable text to being pixels that will not be editable... at least not with a cursor and keyboard. you can still change the look of the text, but at that point, the letters are pixels, just like the base layer {original photo }.
the reason i do this is because when the text is still editiable text {or what's called vector }, you can not erase portions of letters... you can only delete whole letters, and this would make it difficult to make the text appear as if it is going behind something in the photo.
anyway, now that the text is converted to pixels, i can select my eraser tool and click/drag over the areas of text i want to erase... which would be the areas where i want the text to appear as though it is behind the object. for instance, in the photos above and below, i would erase the letters over these areas: the grassy hill and trees and the tree branch, respectively. in the magnolias photo that is in my post below, i erased over the area where the magnolias are so that the text appears to flow behind the tree. does this make sense?
i know there is a way to do this using photoshop paths, but i found this is the quickest and easiest way. i make my eraser brush size as small as i can, so that i can get in close to the edge of the object... i also zoom way in while doing this. this allows for more detailed manipulation and makes it more "realistic" and effective.
well, i hope this made sense and explains it well enough for you to figure out and try for yourself, should you be interested. if it did not make sense, like i said... feel free to let me know. and if you try it, let me know. i'd love to see what you do.
5 comments:
Such great examples ... I'm looking forward to trying this. And thank you for taking the time to share your technique. Happy week to you ...
Groan. . . I need to learn to use layers. It's a waste of Photoshop not to let it be more capable. But so intimidating!
Great examples and wonderful tutorial. Made perfect sense and I will have to try this. Thanks!
Hugs
SueAnn
I started out but didn't know what to look for to convert the text to rasterize it ... is there another name I need to look for?
Thanks for the extra help in the note you left ... on the MAC in Elements 6 you have to "simplify" the text ... I can already tell this will be great fun!
Post a Comment